Sunday 6 November 2011

Christmas cactus flowered at last

Christmas cactus in flower
After two years, my christmas cactus has finally flowered again! Earlier this year I moved it from the living room to a place at the top of the stairs, and it seems to have done the trick. I read somewhere that the main factor that makes them flower is light: around Christmas time the days are shorter, so when the plant receives light fewer hours per day, it flowers. It was darkness that the plant needed. And where it is now we never have the lights on for a long time, unlike the living room. I know these plants are supposed to be very easy maintenance, but it has taken me two years and I'm very proud of these flowers!

Estas plantas, el cactus de navidad, se supone que son muy faciles de cuidar, pero a mi me ha llevado dos anos conseguir que volviese a florecer. Yo antes la tenia en el salon, pero lei que es la oscuridad lo que las hace florecer asi que la movi al hueco de las escaleras, donde nuca tenemos las luces encedidas durante mucho tiempo, y parece que funciono! En esta epoca del ano, hacia navidad, los dias son mas cortos y por eso la planta florece por ahora. Me ha costado dos anos conseguir flores, pero estoy muy orgullosa de ellas.

Sunday 25 September 2011

My first crop of tomatillos

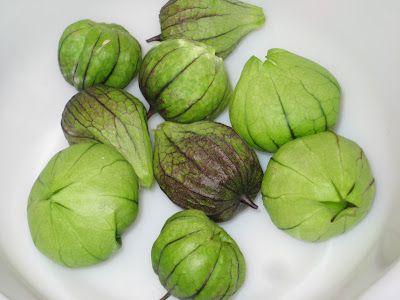
My first crop of tomatillos, picked today
This is my first mini-crop of tomatillos.  I am almost certain that I was so keen to try them that I picked them way too soon.  It's the first time I harvest them (and the first year I grow the plants), and I must confess I didn't do any research about when and how to harvest them beforehand... I just happened to be the allotment, discover the fruits, and I was so excited to feel there was something inside the paper lanterns (they do look like paper lanterns a bit, don't they) that I just took a bunch of them home.  It's only now, reading a few blogs on google, that I realise they may not be quite ripe yet.  But it's OK, I found a couple of recipes for tomatillo salsa that say slightly unripe tomatillos are best, so I'm going to give it a go!  I thought I had lost the plants completely, so it was a great surprise to discover these today.  If they're tasty I will definitely grow them again next year - the plant is really pretty!

Estos son los frutos de una planta que aqui llaman tomatillo.  Yo he visto recetas de salsa mejicana con tomatillos, asi que supongo que el nombre habra llegado al ingles por ahi. Yo no los habia visto nunca, los sembre este ano por curiosidad pero como ya es finales de verano y no habian dado fruto ya me habia olvidado de ellos.  Y cual no seria mi sorpresa hoy al ir a la huerta muncipal y descubrir que habian dado frutos! El fruto esta dentro de esa especie de globo de papel. Me parece que, en mi euforia al descubrirlos, los he cosechado antes de tiempo. A traves de google he encontrado algunas recetas que dicen que para hacer salsa mejor que esten un poco verdes.  Esta noche los cocinare por primera vez, y si estan buenos los volvere a sembrar el ano que viene - la planta es muy vistosa!

Saturday 17 September 2011

Taking cuttings of lavender

Cuttings of phlox and lavender (right)
The lavender plant has been flowering since July, but the flowers are beginning to dry out and it's time to  tidy it up. I started cutting back the flower stems this morning: the stems are very long, and you cut them just at the point where there's a cluster of leaves (if you cut into old wood the plant won't produce new leaves; no hard pruning for lavenders!). You can keep the dry flowers for cooking and to make lavender bags (I'm keeping mine). But I also took some cuttings to reproduce the plant for next year, and these cuttings are different from pruning: for propagation, you're looking for a bit that has grown this year, so it's semi-soft, but hasn't produced flowers.

This bit will be growing off an older branch of harder wood. I've seen Carol Klein do this on TV and rather than cutting she tears them gently so that there's a tiny bit of the bark in the older branch attached at the base of your cutting. This is called a heel. It's difficult to explain, but I guess that if you try taking your twig with your fingers instead of using scissors you'll end up with a bit of heel even if you don't try. Lavender cuttings are more likely to produce new roots if they've got a heel, apparently.

The only other trick is to get rid of the softer top of your twig, and most of the leaves (including all the lower leaves that would get buried anyway).  The reason you do this is because plants lose a lot of moisture through their leaves, especially the softer leaves, and you don't want your cutting to dry out before it produces roots. New roots first, and it'll produce new leaves later. Another thing I do to stop the compost from drying too much is cover the pot with a plastic bag or half-bottle of juice for the first month or so.  

If you look at the phlox cuttings that I took about a month ago, on the left of the photo, you can see that one of them has produced new leaves already. The other one only has the two leaves I left when I took the cutting, but they're still looking healthy so it looks like it's not dead (it would have rotted by now if it hadn't produced new roots).

Esta manana estuve podando la lavanda, que ya han empezado a secarse las flores.  Con la lavanda hay que tener cuidado de no podar demasiado, pues si llegas a la parte mas seca y mas vieja de la planta ya no produce ramas nuevas. Aproveche la ocasion para cortar esquejes tambien, para el ano que viene.  Los esquejes de lavanda que se cortan en esta epoca del ano son ramitas que crecieron en primavera, pero que ahora ya estan un poco mas maduras. Yo las corto de unos 8 cm de largo (mas o menos).  


Hay un truco que he visto en la tele para esquejes de lavanda que consiste en arrancar la ramita con cuidado y dejando en la base un pelin de corteza de la rama mas antigua. Es dificil de explicar, pero seguramente si arrancas la ramita en vez de cortarla con tijeras ya te sale con la base de corteza (es como un pie minusculo), aunque no lo intentes.


El otro truco es quitar todas las hojas, excepto tres o cuatro en la parte de arriba, y tambien arrancar la punta de la rama donde estan las hojas mas blandas.  Esto se hace para evitar que el esqueje se seque antes de tener tiempo de producir raices.  Las plantas pierden un monton de humedad a traves de las hojas, y cuanto mas blanda sea la hoja mas humedad necesita.  Para mantener el compost humedo yo tambien cubro la maceta con una bolsa de plastico transparente o una botella de refresco cortada durante 4-6 semanas.


En la foto a la izquierda veis unos esquejes de phlox (pincha para ver que planta es) que corte hace un mes o asi. Uno de ellos ya ha echado hojas nuevas!  El otro tiene buena pinta, las hojas parecen sanas, lo cual indica que tambien tiene raices nuevas (si no las hojas ya se hubieran muerto).

Sunday 11 September 2011

Tansy (Tanacetum Vulgaris)

Flowers of tansy (tanacetum vulgaris) and a butterfly/moth
I bought a tansy plant in spring, for the only reason that it was in the herbs section of my garden centre, it was cheap, and it was the only herb they had at the time that I didn't have already. And the label said it had yellow flowers, so I thought I'd give it a try.  I have since researched the plant, and I've learn a few more things about this super-plant: first of all, although the flowers may have been eaten in the past in small amounts (I suppose that's the reason they put it with other 'herbs'), the leaves are actually toxic if you eat too much.  So I don't think I'll be eating these - I have enough non-controversial vegetables growing.

The flowers, apart from pretty - and popular with the nectar-eating insect population, when dry can be used to make a spray that repels aphids, and it can also be used as companion planting for the same reason (I put mine next to the tomatoes, just in case). And finally, the leaves are apparently a very good fertiliser and rich in potasium (I think it was).

This plant is perennial and they recommend chopping it to the ground at the end of the summer, so I've just done that (apart from this branch that had the flowers) and put the chopped leaves at the base of my autumn-fruiting raspberries, which will hopefully appreciate the extra potassium and decide to produce some flowers.

Esta planta se llama tanacetum vulgaris. La compre porque estaba con las hierbas aromaticas en la tienda y todas las demas ya las tenia en casa. La vendian como comestible, pero despues de investigar en casa he descubierto varias cosas: para empezar, las hojas son comestibles solo en pequenas cantidades, porque son toxicas. Asi que ya esta fuera de mi lista de comestibles, pues tengo muchas mas plantas que no son toxicas y me sobran para comer. 


Las flores supuestamente repelen el pulgon: o bien por plantarlas al lado de las cosechas que quieres proteger, o tambien puedes secar las flores y hacer un espray casero. Y a las abejas y las polillas/mariposas (como la de la foto) les encanta. Por ultimo, las hojas dicen que tienen un monton de minerales y puedes hacer un "caldo" fertilizante o simplemente ponerlas al pie de las plantas. 


Es perenne y dicen que la puedes podar hasta el suelo al final del verano, que es justo lo que he hecho yo (excepto la rama de la foto con las flores, que las deje porque son muy bonitas), las hojas que pode las he puesto al pie de las frambuesas - a ver si me dan otra cosecha en otono.

Sunday 4 September 2011

Tomato blight, and late-summer tidy up

Saturday was so warm and sunny, it didn't feel at all like we're already in late summer and we need to start preparing for the autumn. Late summer can bring nice days like yesterday, but it's also tomato blight season... And my plants sadly caught it really badly. It came so quick! In literally days the plants went from healthy to covered in brown splotches and wilting leaves. I had to take out all of the plants, which was very sad because I've barely had time to eat any ripe home-grown tomatoes this year. Next year, definitely one crop for the allotment! In the space left by the tomatoes I've sown spinach, radish and parsley, which in theory should give a crop during the autumn.

Tomato plants affected by blight
This cage protecting my kale and tree cabbage from the pigeons and caterpillars (in theory) was too low, so I've made a new taller one. I kept the long branch of nasturtiums though, I can see it from the kitchen and it is so cheerful!

Scrambling flowering nasturtium
In the bed next to the kale and cabbage there's a similar cage with sprouting broccoli, a courgette and a chard plant.  I cleared a space next to them, but I'm waiting until these seedlings are bit bigger before planting them out. I don't want to wait too late and plant them when it's too cold, but bigger plants will (hopefully) resist the slug attack better.

Seedlings in trays awaiting autumn planting

Thursday 1 September 2011

Courgette turned into jam

Homemade marrow and ginger jam jars


This is what I've done with my courgette crop of one (so far). The marrow (or overgrown courgette) was smaller than last year, but I wanted to pick it to encourage the plant to produce more fruit - I've noticed a couple more flowers.

El calabacin era mas pequeno que el del ano pasado, pero lo corte para animar a la planta a que produzca mas fruta - la planta tiene un par de flores.

Tuesday 30 August 2011

Cuttings of sage and phlox

Cuttings of sage and phlox
This is something I did last week: I've taken cuttings of my hot-pink phox, which I really like and want more plants of (it's a perennial), and cuttings of sage to try to overwinter in the plastic greenhouse, or perhaps indoors (frost will kill them).

The plastic cover that you see is to keep the compost moist and give the cuttings a better chance to root (the sage got covered with a clear plastic bag and a clothes peg).  Late summer (that is, August) is supposed to be a good time to take cuttings of some plants - sage is one of them, and I've taken sage cuttings before (successfully). I've never tried to propagate phlox before, but I've read that cuttings taken in August do relatively well. To help save moisture I also cut most of the leaves, including the ones at the top that are softer and always dry out first. The plant only needs a few to stay alive and grow roots, the rest of the leaves only make it dry out too soon before it can produce roots.

I bought this phlox in early spring from the pound shop, because I can't resist a bargain... It has the most amazing pink flowers (see this previous post, under the onions), and it has flowered in a shady spot that almost never gets direct sunlight, so it's definitely on my top list! (ah, and the flowers are scented too. Hopefully next year I'll have a bigger plant and more flowers that I can cut for the house).

La semana pasada he plantado esquejes de salvia y de phlox paniculata (descripcion aqui). La salvia muere con las heladas, y los esquejes son para ver si los puedo mantener a salvo en el invernadero de plastico o en casa hasta el ano que viene. Ya he plantado esquejes de salvia otros anos, y se me dieron bien.


El phlox lo compre en primavera por una libra, fue una autentica ganga y se ha dado de maravilla. Las flores son de un rosa espectacular (mirad aqui, debajo de las cebollas). Es perenne, pero quiero mas plantas en el jardin porque me gusta mucho. Ademas, no hay muchas plantas que den flores en la esquina donde lo tengo, donde casi no le da el sol directo nunca. Y, por si todo esto fuera poco, las flores huelen!


Los esquejes los cubri con plastico para mantener la humedad. El phlox lo tengo con una botella de plastico cortada, la salvia la cubri luego con una bolsa de plastico transparente atada con una pinza. Para que no pierdan humedad, les dejo solo unas pocas hojas y les quito las hojas de la punta, que siempre son las mas blandas y se secan antes. Lo justo para que la planta siga viva y le de tiempo de producir raices antes de secarse.

Wednesday 24 August 2011

Tomatoes finally ripe!

First crop of tomatoes this year

I finally got some tomatoes today. Tonight's dinner will be a culmination of my summer vegetables: lettuce (red deer tongue), tomatoes, cucumber and spring onions, all homegrown!

It's very exciting getting ripe tomatoes, they look amazing suddenly so red standing out against the green, after all these months of only green. I must say, however, that my garden is not the best place to grow them: they mature, but very late! They will do much better with more sunlight, so I think next year I'll grow them at the allotment. My allotment neighbour has had ripe tomatoes since July...

Tarde, pero por fin hoy coseche mis primeros tomates! La cena de hoy va a tener una ensalada completamente de cosecha casera - la culminacion de los vegetales del verano: lechuga, tomate, pepino y cebolletas!


Los tomates en el jardin no se me dan del todo bien. La planta produce fruta, pero tarda mucho en madurar por culpa de la falta de luz. El proximo ano los voy a plantar en la huerta comunal, que tiene mas horas de sol al dia - mi vecina de alli lleva comiendo tomates desde julio.

Monday 22 August 2011

The leek experiment

Leeks planted out

I've been trying to grow leeks for three years now, and so far with very little success. The first time I bought a tray of seedlings from the garden centre in the summer, they survived the winter under a cover of plastic, and well into the spring - when they hadn't even got to the "pencil stem" thickness stage I got bored and cleared them up. This year I sowed seeds in the spring (in a pot), got seedlings very similar (in appearance at least) to the ones from the garden centre, and this week I have planted them out in the ground, with some added garden compost. The brown stuff you see on the photo is ground coffee, which is supposed to keep the slugs away. I have a row of about 12 leeks at home, and a bed of about 20 at the allotment.

I don't know if this is going to work. They are still really small (smaller than the spring onions you buy from supermarkets), and I have doubts they'll grow through the autumn and winter to proper leek size. I always think that vegetables don't really grow much during the darkest and coldest months. But perhaps the leeks will prove me wrong! And in any case, I have all winter to do my research and reading on the optimum time to harvest leeks, perhaps I was too quick to clear the crop in spring the first year I tried growing them?

Por segunda vez voy a probar con los puerros. La primera vez compre una bandeja de plantitas y las plante en verano, pasaron el invierno protegidos con un plastico, y en primavera, como no habian engordado nada, me canse y los levante. Esta vez sembre yo las semillas en una maceta en primavera, y ahora estaban las plantitas mas o menos igual de grandes que las que compre el primer ano. Las he plantado mas espaciadas y con compost casero, a ver si esta vez se me dan mejor! Lo marron que veis en la foto es cafe molido, que dicen que espanta a las babosas y caracoles. En casa tengo una fila de 12 puerros, y 20 mas en la huerta municipal.

No tengo claro cuando se supone que tienen que estar listos, porque estos son tan pequenos que no les va a dar tiempo de engordar antes de que llegue el invierno. A lo mejor tengo que dejarlos mas tiempo en primavera para que les de tiempo de engordar? En fin, tengo todos los meses del invierno para leer mis libros e informarme, a ver si de una vez consigo puerros de verdad!

Saturday 20 August 2011

Saving seed and sowing for the autumn

Some seed gets saved, some gets sown
This time of the year there isn't as much to do as back in the spring, and more time to be outside enjoying the flowers and the food, but there are still some jobs I can do. I have started saving seed of my favourite annual flowers to sow again next year in spring. This is really easy, and because I've done it for three years already I know which seeds work better in my garden (that is, the seed is easy to save and the plants will flower in my shady garden in pots).

I always keep seed of calendula: simply leave some flowers dry out in the plant and then cut the whole dry head (it has lots of curved dry bits, each of one is a seed). Nigella is also very easy to pick: it produces a papery ball full of the little black seeds, if you let it dry you can pick the ball whole. Other seeds I save are: nasturtium, tagetes (french marigold), purple wallflowers (matthiola incana) and honesty (these two are biennials - you sow them this summer for flowers next year). And rocket leaves (I left one corner of it go to flower).  Today I have saved some dry flowers of cosmos for the first time: I sowed some seed I bought this past spring for the first time and it's been a huge success, so now I want to see if I can take it a step further and also save my own seed for next year!

Once you've picked the seed pods or flower heads, they need to dry out completely before you can store the seed away - otherwise they'll rot. I put them in paper bags (you can see a couple in the photo) and hang them from the ceiling of the shed. After a month or so, when they're dry, I will put them in paper envelopes until next spring.

Another thing I'm doing now is keep sowing plants for the autumn. I have sowed the plugs you see in the photo with turnip tops ('grelos' is the local name from Galicia, where I come from) an spinach. These two, if they get big enough and established before it gets too cold and dark, should keep during the most of the winter, although I fear I may have left it too late and they won't have enough summer left, but we'll see.

En agosto hay menos que hacer que en primavera, y mas tiempo para disfrutar de todas las flores y cosechas, pero hay un par de trabajos que si hay que hacer ahora: recoger semilla para el ano que viene, y sembrar para cosechas en otono. Las semillas de flores anuales son facilisimas de recoger, el unico truco es esperar a que las flores se sequen y cortarlas! Yo las pongo en bolsas de papel para que se sequen, las tengo colgadas del techo de la caseta. Dentro de un mes, cuando esten completamente secas, las pondre en sobres hasta la primavera que viene.


Despues de tres anos sembrando flores y guardando semilla, ya se cuales funcionan mejor (y cuales dan flor en las macetas y la sombra de mi jardin). Siempre guardo semilla de: calendula, tagetes, nigella damascena (pincha aqui para ver una foto), lunaria y alhelies morados (estas dos ultimas son bianuales, se siembran este verano y dan flores el ano que viene). Este ano voy a probar por primera vez a guardar semilla de cosmos, porque esta primavera pasada sembre semilla comprada y se han dado de maravilla!


La otra labor del dia ha sido sembrar para cosechar en otono. He sembrado, en las celulas que veis en la foto,  grelos y espinacas. No se si les dara tiempo de crecer lo suficiente antes de que llegue el frio y los dias cortos, deberia de haberlos plantado a principios de mes, pero a ver que pasa.

Monday 15 August 2011

My onion harvest

Crop of onion 'stuttgarter'

I finally harvested my onions yesterday. It had been dry for a few days, so the onions shouldn't be too wet - they need to be dried before you store them, to avoid them rotting or getting mouldy. The soil at the allotment is so heavy that some of the onion stems snapped when I was pulling the onions out, but most of them kept their stems. With the longer stems I have made two plaits and the rest I simply bunched up and tied together, as you can see in the photo. They're all hanging from the ceiling in the shed now, waiting to be cooked!

Ayer toco osecha de cebollas. Llevaba sin llover un par de dias, asi que las cebollas estaban secas. Y ahora que las he colgado del techo de la caseta se mantendran secas y, si todo sale bien,  nos duraran unos cuantos meses. La tierra de la huerta es muy dura, y al tirar de las cebollas algunos de los tallos se rompieron; pero con todas las demas he trenzado las dos ristras y los dos manojos que veis en la foto. Ya tenemos cebollas en la despensa para cocinar!

Saturday 13 August 2011

Water cuttings from sweet rocket

Water cuttings from sweet rocket

These are some cuttings of sweet rocket that I took a few weeks ago. Of six cuttings I took, four have developed tiny white roots, quite a result! Two of them are doing really well - you can see them in the photo: they have green leaves, and one of them has even flowered.  I like the decorative stand with the glass "test tubes", it looks pretty on the windowsill while I'm waiting for the cuttings to grow new roots.

Today I decided to plant them outside. but to minimise the shock (these have been in the kitchen window for weeks now) I covered them with a a half plastic bottle. Hopefully they'll take!

Estos esquejes de hesperis matronalis los corte hace unas semanas, y han estado en la ventana de la cocina hasta hoy. Este soporte con los "tubos de ensayo" es muy decorativo, y hace bonito mientras espero que los esquejes echen raices.  De los seis esquejes que corte, cuatro han echado raices, y dos de ellos - los veis en la foto - han echado hojas tambien, y uno hasta tiene una flor!


Hoy los plante fuera por fin. Como llevan en interior varias semanas, los cubri con una botella de plastico cortada a la mitad, para que no sufran demasiado con el cambio. 

Sunday 7 August 2011

Homegrown cut flowers

Homegrown cut flowers in my two favourite vases
I love having bunches of flowers in the house that I cut from the garden - it's almost as satisfying as growing food! And now that the garden is a little bit more established, I tend to have enough flowers to share with the bees... 


Cortar flores del jardin para poner en el jarron dentro de casa me da casi tanta satisfaccion como cortar hojas y fruta para comer. Y ahora que el jardin esta un poco mas establecido, suelo tener suficientes flores para cortar y dejar en la planta. Esta es la lista (abajo) de que flores tengo ahora para el jarron.

This is what I'm growing and cutting at the moment (between pots, a small bed on the ground, and weeds in between cracks in the concrete patio). Some don't last very long once cut, such as the budleia, but they look and smell so lovely that if I have spares I would cut one or two for a short-term display indoors!:


Picking now, summer (verano):

Roses (rosas)
Sweet Rocket (hesperis matronalis)
Lavender (lavanda)
Perennial Wallflower (alhelies morados)
Freesia
Budleia 
Calendula
Nigella
Cosmos
Pinks (clavelinas)
Petunias
Sweetpeas (Lathyrus odoratus)
Fushias


For foliage (hojas):
Weeds - including grasses (hierbas silvestres)
Sambucus nigra
Golden choysia


Picking in spring (primavera):
Hyacinth (jacintos)
Daffodils (narcisos)
Bluebells (campanillas azules)
Scillas (campanillas ibericas)
Honesty (lunaria)


To add for next year (mas para el ano que viene):
Red clover (trebol de flor roja)
Cornflower (centaurea)
Chocolate cosmos
More sweetpeas (mas Lathyrus odoratus)

Thursday 4 August 2011

What to sow in August

WHERE:
There's lots to harvest now, and as some crops get eaten or die off they leave new spaces where to make new sowings. (Beetroot, lettuces sown early in spring, garlic, potatoes, onions, early peas, broad beans - these are normally dead or eaten come August).

WHAT:
There's two main options: a) you can either sow quick crops that will grow and get harvested before the end of the summer (October); or b) sow plants that will grow through the winter and you can eat during the winter or early spring.

HOW:
Same as you did in spring, you can either wait until you lift one crop and sow directly in the newly cleared ground; or sow in small pots (also called modules, or plugs), and plant out the little seedlings later on. Growing seedlings in pots means that you can start early and at the same time that you have the old crop still producing, thus minimising the gap until your next crop is ready. When you have little space this is a good option, otherwise you'll be without anything to harvest for a couple of months!

I dug up my potatoes last month (it was an early variety), so in that bed I planted (all grown in pots beforehand): swede, turnip and kale (for winter); lettuce, pak choi and spinach (for a quick crop before it gets too cold). This weekend I'm going to lift the onions and sow some more stuff, but because I haven't got any more seedlings in pots left they'll have to be direct sowings. I think I'm going to go for quick crops (the seed packet confirms they should be ready in 8-10 weeks, that means early October - still before any frosts, hopefully!): lettuce, cress, radishes, maybe some quick carrots (the varieties called 'early' tend to be faster-growing), spinach, pak choi. I don't like the taste of oriental salad leaves like mizuna, but they're good to sow this time of the year too.

There are special varieties of lettuce that grow better in cold weather, so I'll go for those. Spinach also don't mind growing into autumn. And, if you cover them with plastic (I make my own cloches with bamboo canes and clothes pegs) they last a bit longer - until it gets too cold and too dark.

Donde se van cosechando lo que plantamos en primavera, van quedando huecos, y ahora es el momento de plantar cosas nuevas. Por ejemplo, mis patatas las levante el mes pasado, y en su sitio he plantado: berzas, nabos, grelos, lechugas y espinacas. Este fin de semana levantare las cebollas, y sembrare: mas lechugas (de otro tipo, para variar), espinacas (que nos encantan), zanahorias (una variedad que madura rapido) y rabanitos.

En agosto se pueden plantar dos tipos de cosas: a) cosechas rapidas que maduran en dos meses (el paquete de semillas suele poner cuanto tiempo tardan en madurar, "8-10 semanas" quiere decir principios de octubre, cuando todavia no hace demasiado frio - antes de las heladas); o b) plantas que aguantan todo el invierno fuera, como berzas, nabos, brecol, coliflores, repollos.

Yo a menudo siembro en macetas pequenas, porque asi la planta va creciendo mientras la cosecha primera todavia esta en la tierra, y cuando levantas las plantas viejas ya tienes una planta medio desarrollada. De esta forma tienes que esperar menos tiempo hasta que la segunda cosecha este lista (en vez de 8-10 semanas, quizas solo 4-6), y cuando tienes poco espacio lo ultimo que quieres es tener que esperar dos meses hasta poder volver a comer algo...

Friday 29 July 2011

DIY planter from recycled materials

New home for my japanese anemones
Nick and I built this planter last weekend. Actually, Nick did the building and I did the planting. The wood was a left-over panel from the shed (it was homemade and already here when we bought the house), and we discovered it back in spring when I painted the shed. We cut in in 4 parts and assembled what you see, with weed matting for the bottom. I was going to paint it first, but I now I quite like the shabby appearance, and it reminds me of where the panel comes from!

All of the plants I had already, except for the trailing one with the white flowers, which is called Bacopa. One the left are some irises that were on the ground when we bought the house, and which I have kept in pots until now (I had to lift them when we built the vegetable raised beds), and behind the bacopa is a japanese anemome that I bought three years ago and was surviving (but not thriving much) in a very small trough. All three plants have already flowered in shady conditions, which is perfect for where I have put this planter - in the corridor between our house and the neighbours'. They also flower in different seasons (irises in late winter, bacopa in summer and anemones in autumn) so there will always be something interesting going on. All in all it only cost me £8: £5 for the compost and £3 for the bacopa :-)

Esta jardinera la construimos Nick y yo el fin de semana pasado. Es decir, Nick la construyo y yo la plante. La madera era un panel sobrante de cuando los duenos anteriores construyeron la caseta, y que descubrimos en primavera cuando pinte la caseta. Las plantas, excepto la rastrea de las flores blancas (le llaman bacopa) ya las tenia: a la izquierda hay unos iris que ya estaban en el jardin cuando compramos la casa, y que tuve que pasar a macetas cuando construimos la huerta; y detras de la bacopa hay una planta que en ingles le llaman "anemona japonesa", japanese anemone, pero no se el nombre en espanol. Pinchad aqui para ver una foto de las flores. Estas tres plantas ya han dado flores en condiciones de poca luz, lo cual es perfecto para el sitio donde he puesto la jardinera: entre nuestra casa y la del vecino. Los iris florecen a finales de invierno, la bacopa en verano y las anemonas en otono, asi siempre hay algo interesante que ver! En total los materiales solo me costaron 8 libras: 5 del compost y 3 de la bacopa, todo lo demas fue reciclado!

Tuesday 26 July 2011

My seat outside

My seat in the garden
This is where I have my breakfast every morning - and sometimes, like today, a beer in the evening. The thought of breakfast outside is what really gets me out of bed! I particularly love this time of the year, when there's lots of flowers and the lavender smells gorgeous. It's always full of bees, especially in the morning (my garden faces East and gets the sunlight early). And the photo below is what I'm looking at while I'm seating...

Aqui es donde me siento todas las mananas a tomar el desayuno. Y a veces por las tardes al  volver del trabajo, como hoy, me siento con una cerveza y un libro, o el ordenador. Por las mananas la idea de desayuno (con mi cola-cao) y sentarme al lado de la lavanda es lo que consigue sacarme de la cama! La lavanda huele de maravila, y esta siempre llena de abejas - sobre todo si es un dia soleado. Mi jardin da al este y el sol le da temprano, perfecto para mis desayunos! La foto de abajo es la  vista desde el asiento:


View from my seat

Sunday 24 July 2011

Crop of Purplee Teepee french beans

Purple Teepee beans
I picked these beans this morning. They are a variety of french bean called Purple Teepee, and as you can see they are mostly purple. These come from a couple of plants that have been growing in part shade, and the parts of the beans that were more in shade are more green and less purple. To get really dark purple beans I think you need to grow them in full sun (that's one for the allotment next year). But I'm quite pleased with this crop, it will make a meal for two and I didn't do much for the plants. I planted the seed back in spring, then planted it outside and let the plants get on with life. Lately they were attacked by slugs and snails that ate all of the leaves, but luckily left the pods. I had three plants, and one of them still has a few leaves and flowers, so I left it to see if I get a smaller crop next month, but the other two plants were completely gone and I had to pull them up. Still, I like this bean and I think I'll grow it again next year. It's a low-growing bean (it doesn't climb) and the flowers are purple too, very pretty!

Estas judias moradas son una variedad que se llama Purple Teepee, y como veis son moradas. Las plantas estaban en semisombra, y a las que les dio mas sombra estan mas verdes que moradas. Para conseguir el color morado oscuro tienen que crecer en mas sol, el ano que viene las plantare en la huerta municipal. Es el segundo ano que planto estas judias y la verdad es que me encantan. La planta es de mata baja y las flores son tambien entre rosa y violeta, muy bonitas. Son faciles de cultivar, yo sembre la semilla en primavera, las plante en el jardin en mayo y no las he vuelto a tocar hasta ahora. Los caracoles las atacaron este ultimo mes y se comieron casi todas las hojas, pero por suerte las judias no. Una de las plantas (tenia tres) aun tiene unas pocas hojas y un par de flores, asi que la he dejado a ver si me dan una segunda mini cosecha el mes que viene, pero las otras dos plantas las he tenido que levantar - no quedaba mas que los tallos pelados!

Thursday 21 July 2011

Cucumber success!

Cucumber cropping happily in a big pot

This is what we're having with dinner tonight. It is also the first ever cucumber I managed to grow! After all the disasters this spring, including seedlings collapsing, plants eaten by slugs, and one completely squashed in a too-energetic car-breaking manoeuvre, I finally managed to grow two cucumber plants together in a big pot, one of them has produced this jewel :-). It has got little embryo fruits, I hope now that I have removed the ripe fruit the plant will be tricked into maturing new fruits. Will see!

Este pepino maravilloso lo coseche esta semana. Es la primera vez que una planta de pepino me da fruta, y la verdad es que el sabor es mucho mejor que los de la tienda! Me costo conseguir la planta: tras los desastres de las semillas que germinaron y colapsaron (en febrero y marzo), y la planta que me dio Veronica y que sufrio un accidente de trafico (al frenar el coche alla fue la planta de cabeza, y no sobrevivio), y una que compre y que se comieron los caracoles, por fin! Esta planta tamien es comprada, y aparte de este pepino maduro tiene otras mini-frutas formadas donde hubo flor. Espero que al quitarle la fruta madura la planta reaccione madurando otras...

Sunday 17 July 2011

Borage flowers in ice cubes

Borage flowers
I sowed my borage in early spring, and even in my shady garden it has done well and is now covered in pretty blue flowers. I have heard that you could eat the young leaves - apparently they have a cucumber taste! - but I didn't have the heart to strip my young plants out of leaves. However, I also read somewhere that the flowers are edible, and because of the cucumberish taste you can add them to your summer pimms for a touch of colour and flavour. So, to combine flower preservation with use in drinks, I have made these ice cubes, they look amazing! I can't wait to see them in a glass of pimm's :-)

Sembre semilla de borago officinalis a principio de primavera, y se ha dado bien incluso en mi jardin sombrio. Estan llenos de estas flores azules tan bonitas. He leido que las hojas tiernas se pueden comer, tiene un sabor que recuerda al pepino, pero a mi me dio pena pelar las plantitas y las deje crecer. Las flores tambien son comestibles, asi que he decidido conservar unas cuantas... en cubitos de hielo, para poner en cocteles veraniegos! 


Wednesday 13 July 2011

Harvest of salad


I'm harvesting salad leaves almost every day at the moment. Most of these in the photo come from the allotment: there are several plants there and with the good soil and sun they're growing strongly, even without watering! The ones in the garden get more water but less sun, and they're not so big. I particularly like the red one that has leaves shaped like and oak's. Next year I want some seed of that one!

Las lechugas me estan dando hojas para cosechar casi todos Los dias. Estas de la foto son de la huerta comunal. Las de la huerta tienen mas sol, y a pesar de que solo se riegan con la lluvia estan mas grandes que las del jardin de casa. Y como solo corto unas picas hojas de cads planta cada vez, cuando vuelvo han echado hojas nuevas, es rapidisimo! Mis hojas favoritas son unas rojas con forma de hoja de roble. El año que viene voy a comprar semilla de esta!

Tuesday 5 July 2011

First raspberries

Raspberries on last summer's cane

These were the first raspberries from my own plants, before I ate them! I planted the canes last summer, and they're supposed to be autumn fruiting. But these were early fruits on last summer's canes, which I didn't prune to the ground when I planted. I think the trick is in the pruning: if you leave the canes standing, they fruit early (summer, about now); but if you cut them down, you get new canes that grow during spring and summer and fruit in the autumn. So what you do is you prune only half of your canes every autumn, to get crops in summer and autumn next year - well, at least that's the theory I've read. My plants have new canes growing, let's hope I get more raspberries in the autumn because they are delicious!

Estas frambuesas duraron en la planta lo justo para sacar la foto. Las plante el ano pasado a principios de otono, y estas frutas han salido de las canas que plante. Tambien han salido ramas nuevas, y en teoria en otono deberia de tener una segunda cosecha de frambuesas en las ramas nuevas. A ver si la teoria funciona! Este otono podare las ramas del ano pasado y dejare las que han crecido este, y asi el proximo verano tendre frambuesas en verano y en otono otra vez.

Thursday 30 June 2011

Harvest of garlic - bigger than ever!

My garlic harvest of 2011

I harvested my garlic last weekend, and this year is much better than last! Some of the garlic heads have actually split into cloves, and they're also much bigger than last year's. They were in exactly the same spot, so I have to assume it all the home-made compost I've put into the soil has paid off! They have a saying in Spain that you should plant the garlic in St Martin's day (11 November) and harvest it on St Peter's day (29 June, today exactly), and this season I haven't been more than a week off either side, so maybe that is the trick :-)

Aqui estan mis ajos, que coseche en unos dias antes de San Pedro. Este ano son mucho mas grandes que el ano pasado, y eso que los plante en el mismo sitio! A lo mejor fue porque mezcle compost casero con la tierra. O eso, o es porque segui los consejos tradicionales y los plante en San Martin y los coseche en San Pedro (semana arriba o abajo)! :-) Pero el caso es que estan mucho mas grandes que el ano pasado, de hecho el ano pasado no tenian ni dientes, eran todos una bola uniforme (del tamano de una canica gorda), pero mirad que hermosos estan estos!


Wednesday 22 June 2011

Introducing Ploppy the frog

First sighting of Ploppy the frog

Finaly, after weeks of hearing evidence of frog activity (a 'plop' when I approached the pond to remove fallen leaves), today I have had visual confirmation that the pond has a resident frog. We called her Ploppy because she goes 'plop', and we have a bunny called Poppy so we thought it was funny. Poppy and Ploppy. Yeah, it's not very funny, but too late now: the frog is Ploppy now. She's smaller than Gustavo, the frog I saw last summer. She was hiding under a small rotting log I put by the side of the water, under an astilbe plant. The astilbe shows sign or rust of some kind of fungal infection on the leaves, but I can't spray it with the usual anti-fungal chemical spray because it's harmful to aquatic life. I'd rather have the frog and lose a plant, at least the plant I can buy from a shop. The frog is special, she is there because she chose to. I liked looking at her in the pond and think that she had all of that realm to swim about. It looked more complete.

Sunday 19 June 2011

Jobs of the weekend: orach, tomato plants and new sowings

I haven't had much time to garden these past two weeks, but finally this weekend I managed to tick off some jobs of my 'to do' list.
Estos son los trabajos del fin de semana:


Orach 'Magenta'
I sowed 'magenta' orach a couple of months ago and I've been nursing the seedlings in pots, and today I finally planted them in the ground. I got the seeds from The Real Seed Catalogue because they sounded interesting; they are red, a spinach substitute, and not sold in shops. I managed to sprout the seeds, so far so good, but I have yet to taste the leaves.

Las plantitas rosadas que veis son 'orach'. Las sembre hace dos meses y salieron bien, pero aun estan pequenas asi que aun no he hecho cosecha. Las semillas las venden como un sustituto de las espinacas, y las compre porque son rojas y hacen bonito, pero aun no se como son de sabor.

Tomato plants tied up to their supports
My tomato plants are growing strong in their big pots (the green and the black in the photo), but they needed some maintenance desperately. I removed the lateral shoots that won't produce fruit (the one in between a lateral branch and the main stem), which already made the plants much lighter (more air circulation means less danger of blight), and I tied them to their supports so they grow straight and don't break with the weight of the fruit. I don't have flowers yet, but the plants are looking strong so I have hope!

Las plantas de tomates estan creciendo bien en sus maceteros, pero antes de que crezcan demasiado y se rompa la rama les quite los brotes laterales (los que crecen entre la rama lateral y el "tronco") y las ate a los soportes. Aun no tienen flores, pero por lo menos las plantas parecen sanas y felices.

Seedlings corner
I sowed some trays of things for later in the summer. Because I don't have space in the beds to sow directly I'm starting the seedlings in trays and will transplant them later (like I did with the orach). These shelves are by the side of the house and gets quite windy, so I'm keeping the plastic covers on so the compost doesn't dry too much (and tied down with string so they don't fly away!). I have one tray each of: Leaf salad, red deer tongue lettuce (very tasty!), basil, little gem lettuce, red pak choi, turnip tops, swede and honesty (it's a biennial flower, you sow it now for flowers next year).

Este es mi semillero. Como no tengo mucho espacio en la tierra, siembro en bandejas para transplantar mas adelante. Esta estanteria esta al lado de la casa y le da mucho viento, asi que les he puesto las tapas de plastico para que el compost no se seque demasiado. Hoy he sembrado una bandeja de cada de: una variedad de lechuga de hojas grandes, otra que hace roseta pequena, otra de hojas rojas moteadas (muy rica), repollo chino (se comen las hojas sueltas), grelos, albahaca, un tipo de nabo que le llaman sueco aqui (esta muy rico anadido al pure  de patatas o asado), y lunarias.


Borlotti and Purple Teepee beans
The borlotti beans in this bed were throwing long tendrils and wanting to climb so I put two bamboo arches. I have read they're not tall climbers, but this is the first year I grow them so I may be wrong! The purple teepee beans next to them are low, I know because I grew them last year too. And to the right of them I have planted a courgette.

En esta jardinera tengo dos tipos de judias de mata baja, pero unas de ellas estaban echando tallos como para trepar asi que les he puesto unos arcos de bambu. Las otras ya estan echando flores (moradas). Y a la derecha he plantado un calabacin.

Thursday 2 June 2011

What's in flower at the allotment now

I went to the allotment this evening after work, just to have a look, and I took this photos of what is flowering right now (with my phone, excuse the bad quality!). Esta tarde a la vuelta del trabajo fui a dar una vuelta por la huerta, y estas plantas estan en flor (saque las fotos con el telefono, las fotos no son muy buenas):


Bee among the broad bean flowers (abeja entre las habas)


Nasturtium among the onions (cebollas detras de la flor)

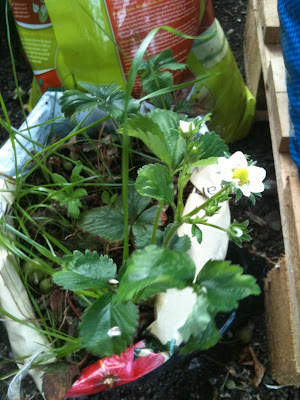
Strawberry flower in old bag of compost (fresa en flor)
Perennial wallflowers and honesty (alhelies y lunarias)

Peas, borage, tree cabbage and broad beans
(guisantes, borrago, berza y habas)


Friday 27 May 2011

My favourite bit at Chelsea

'A Children's Garden in Wales', designed  by Heronsbridge and
Ysgol Bryn Castell Schools with Anthea Guthrie

Of all the pretty things I saw at the Chelsea Flower Show, this has to be my favourite corner of all. This is how I want my garden to look. I kept going back to look at it, it made me want to be inside it! I love the contrast between the orange of the marigolds and the blue of the nigella. One corner of my flower bed is planted with exactly those two flowers (except mine aren't flowering yet). It was very reassuring to see how good it can look, and also that it won a gold medal at Chelsea and I had the idea first :).

Este fue mi jardin favorito del Chelsea Flower Show. Me encanta el contraste del naranja de la calendula con el azul de la nigella. Una esquina de mi rincon de flores lo tengo plantado con la misma combinacion, aunque las mias aun no tienen flor, asi que me animo ver lo bonito que puede llegar a ser. Y tambien me gusto ver que la misma combinacion de flores que yo elegi gano una medal en Chelsea :).

Tuesday 24 May 2011

Flowers I won't grow from seed again

I have been trying to grow wallflowers and foxgloves from seed since last year (they're biennials: you sow them in summer, they grow over the autumn and winter and - in theory - flower the following spring). And, I have to confess, they have been a disappointment: I got lots of leaves.... but no flowers! I almost expected it from the wallflowers (they like full sun, which I don't have), but... foxgloves? They're supposed to like the shade!

Wallflower (leaves) and small foxglove plants (in copper rings)

But all I got was some leaves, and they aren't even very big ones. And many got eaten by the snails. I've been watching the Chelsea Flower Show on the BBC and I have foxglove envy. I think perhaps it's because I've grown them in pots and only transplanted them into the ground a couple of months ago? They may just be slow, and flower later in the year? I'm going to leave them, but if by the summer I still have no flowers I don't think I'll bother with sowing them again. I got a plant from the garden centre last year (much bigger and already in bloom) and it kept the flower for some weeks, so I may do that instead and reserve my sowing and potting time for vegetables, which are much more grateful (in general). And I only have space for a few flowers, so it won't break the bank.

Hay dos flores que sembre el ano pasado y que deberian estar en flor ahora (son bianuales), pero que han sido un fiasco: alhelies amarillos y digitalis. En la foto veis que los alhelies solo han producido hojas (eso si, muy frondosas) y las digitalis ni siquiera eso: sin flores y raquiticas. En teoria se deberian de dar bien, porque les gusta la sombra. A lo mejor es porque las sembre en maceta y solo las puse en el suelo hace un par de meses? Las voy a dejar hasta el verano, pero si siguen sin dar flores no creo que la vuelva a sembrar este ano. El ano pasado compre una planta, ya en flor, y se dio bien, asi que reservo los semilleros para verduras y cosas que se me dan mejor - solo tengo sitio para unas pocas plantas, en todo caso, asi que no me voy a arruinar por comprarlas en el vivero.

Thursday 19 May 2011

Allotment raised beds for crop rotation

I finally built the fourth raised bed at the allotment. I'm not being too strict with the crop rotation division, but I'm broadly trying to keep the four groups of crops separate: potatoes, root crops (onions, garlic), legumes (peas and beans), and brassicas ("green stuff" - kale, broccoli, cabbage, chard). Each type uses up different nutrients from the soil and develops similar diseases, so it's good in theory to move them about your plot every year. I don't think this is so crucial in a very small space, but it's a great excuse for tinkering and planning planting plans!

Ya tengo cuatro jardineras en la huerta. La teoria dice que se repartan las cosechas en cuatro grupos y se alterne cada ano para no sembrar lo mismo siempre en el mismo sitio - para no empobrecer el suelo demasiado (cada grupo necesita nutrientes distintos). Yo no creo que se note mucho en un terreno tan minimo, pero es una buena excusa para planificar las cosechas y entretenerme!

From front to back:
Bed 1: Potatoes. I earthed them up with some compost and gravel that I had left over; it's got a double purpose: covers the potato roots now, and when I dig it all up at the end it will help improve the soil.

Jardinera primera:
La gravilla proteje las raices de las patatas del sol, y mejora la calidad de la tierra

Bed 2: Onions, and a row of nasturtiums and calendula. The ground is covered by a mulch of the dry leaves from the jasmine I chopped from the shed...

Jardinera segunda: Cebollas
Bed 3: dwarf peas (already climbing up their mini sticks), broad beans, and in between a plant of borage and a small square of leek seedlings

Jardinera tercera: Guisantes y habas (no en la foto)

Bed 4: two rows of sprouting broccoli seedlings, one of red chard, one of Borlotti beans, and I'm ging to build a teepee for four runner bean plants. This is the one at the back with the taller frame of bamboo canes; birds love to munch of these leafy plants so I'm going to cover them with netting.


General view of my allotment strip

La cuarta jardinera tiene: brecol, berzas, judias y frijoles. El soporte de canas de bambu es para poner una red por encima para que que los pajaros no se coman las hojas de estas plantas, que les encantan.


En la parte de atras tengo macetas sembradas con cebolletas y zanahorias

Behind the trees, and in front of the flowers at the very back, I have at the moment a platform made with two pallets and lots of containers (the three blue things are Ikea bags) filled with compost. I sowed all the pots with carrots and spring onions, and the bigger bags are awaiting a courgette, a tomato and whatever else I run out of space for! I hope it is productive, but next year I want to build another raised bed in its placed, as containers need more frequent watering and I only go there at weekends. Plus, I think it will look better!

Monday 16 May 2011

Shed makeover!


Clematis flowering on the arch

Painted shed and fence, rambling rose in a pot and new hanging basket


I did over the last bank holiday weekend, but didn't have Internet to post photos until today... This is what my shed looks like now! It used to have peeling paint and an evergreen jasmine covering the roof and most of the front, but the jasmine died last winter. Clearing the dead jasmine felt quite brutal, but it gave me the opportunity to revamp the shed with new paint and glass lanterns, as well as new hanging baskets and a rambling rose up the trellis at the front. A much prettier view from the kitchen!

Esta es una de las obras de las vacaciones de semana santa. La caseta estaba cubierta casi por completo por un jazmin y pintura vieja, pero el invierno pasado el jazmin se seco. Al quitarlo ya pude pintar toda la superficie, y ha quedado mucho mas elegante! Tambien me ha dejado sitio para unas cestas colgantes (en dos tengo fresas y en la tercera voy a poner un tomate pendulo), y un rosal trepador en el frente para que cubra el soporte de madera.