Sunday, 25 September 2011

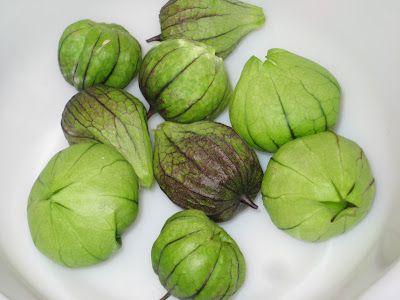
My first crop of tomatillos

My first crop of tomatillos, picked today
This is my first mini-crop of tomatillos.  I am almost certain that I was so keen to try them that I picked them way too soon.  It's the first time I harvest them (and the first year I grow the plants), and I must confess I didn't do any research about when and how to harvest them beforehand... I just happened to be the allotment, discover the fruits, and I was so excited to feel there was something inside the paper lanterns (they do look like paper lanterns a bit, don't they) that I just took a bunch of them home.  It's only now, reading a few blogs on google, that I realise they may not be quite ripe yet.  But it's OK, I found a couple of recipes for tomatillo salsa that say slightly unripe tomatillos are best, so I'm going to give it a go!  I thought I had lost the plants completely, so it was a great surprise to discover these today.  If they're tasty I will definitely grow them again next year - the plant is really pretty!

Estos son los frutos de una planta que aqui llaman tomatillo.  Yo he visto recetas de salsa mejicana con tomatillos, asi que supongo que el nombre habra llegado al ingles por ahi. Yo no los habia visto nunca, los sembre este ano por curiosidad pero como ya es finales de verano y no habian dado fruto ya me habia olvidado de ellos.  Y cual no seria mi sorpresa hoy al ir a la huerta muncipal y descubrir que habian dado frutos! El fruto esta dentro de esa especie de globo de papel. Me parece que, en mi euforia al descubrirlos, los he cosechado antes de tiempo. A traves de google he encontrado algunas recetas que dicen que para hacer salsa mejor que esten un poco verdes.  Esta noche los cocinare por primera vez, y si estan buenos los volvere a sembrar el ano que viene - la planta es muy vistosa!

Saturday, 17 September 2011

Taking cuttings of lavender

Cuttings of phlox and lavender (right)
The lavender plant has been flowering since July, but the flowers are beginning to dry out and it's time to  tidy it up. I started cutting back the flower stems this morning: the stems are very long, and you cut them just at the point where there's a cluster of leaves (if you cut into old wood the plant won't produce new leaves; no hard pruning for lavenders!). You can keep the dry flowers for cooking and to make lavender bags (I'm keeping mine). But I also took some cuttings to reproduce the plant for next year, and these cuttings are different from pruning: for propagation, you're looking for a bit that has grown this year, so it's semi-soft, but hasn't produced flowers.

This bit will be growing off an older branch of harder wood. I've seen Carol Klein do this on TV and rather than cutting she tears them gently so that there's a tiny bit of the bark in the older branch attached at the base of your cutting. This is called a heel. It's difficult to explain, but I guess that if you try taking your twig with your fingers instead of using scissors you'll end up with a bit of heel even if you don't try. Lavender cuttings are more likely to produce new roots if they've got a heel, apparently.

The only other trick is to get rid of the softer top of your twig, and most of the leaves (including all the lower leaves that would get buried anyway).  The reason you do this is because plants lose a lot of moisture through their leaves, especially the softer leaves, and you don't want your cutting to dry out before it produces roots. New roots first, and it'll produce new leaves later. Another thing I do to stop the compost from drying too much is cover the pot with a plastic bag or half-bottle of juice for the first month or so.  

If you look at the phlox cuttings that I took about a month ago, on the left of the photo, you can see that one of them has produced new leaves already. The other one only has the two leaves I left when I took the cutting, but they're still looking healthy so it looks like it's not dead (it would have rotted by now if it hadn't produced new roots).

Esta manana estuve podando la lavanda, que ya han empezado a secarse las flores.  Con la lavanda hay que tener cuidado de no podar demasiado, pues si llegas a la parte mas seca y mas vieja de la planta ya no produce ramas nuevas. Aproveche la ocasion para cortar esquejes tambien, para el ano que viene.  Los esquejes de lavanda que se cortan en esta epoca del ano son ramitas que crecieron en primavera, pero que ahora ya estan un poco mas maduras. Yo las corto de unos 8 cm de largo (mas o menos).  


Hay un truco que he visto en la tele para esquejes de lavanda que consiste en arrancar la ramita con cuidado y dejando en la base un pelin de corteza de la rama mas antigua. Es dificil de explicar, pero seguramente si arrancas la ramita en vez de cortarla con tijeras ya te sale con la base de corteza (es como un pie minusculo), aunque no lo intentes.


El otro truco es quitar todas las hojas, excepto tres o cuatro en la parte de arriba, y tambien arrancar la punta de la rama donde estan las hojas mas blandas.  Esto se hace para evitar que el esqueje se seque antes de tener tiempo de producir raices.  Las plantas pierden un monton de humedad a traves de las hojas, y cuanto mas blanda sea la hoja mas humedad necesita.  Para mantener el compost humedo yo tambien cubro la maceta con una bolsa de plastico transparente o una botella de refresco cortada durante 4-6 semanas.


En la foto a la izquierda veis unos esquejes de phlox (pincha para ver que planta es) que corte hace un mes o asi. Uno de ellos ya ha echado hojas nuevas!  El otro tiene buena pinta, las hojas parecen sanas, lo cual indica que tambien tiene raices nuevas (si no las hojas ya se hubieran muerto).
Sunday, 11 September 2011

Tansy (Tanacetum Vulgaris)

Flowers of tansy (tanacetum vulgaris) and a butterfly/moth
I bought a tansy plant in spring, for the only reason that it was in the herbs section of my garden centre, it was cheap, and it was the only herb they had at the time that I didn't have already. And the label said it had yellow flowers, so I thought I'd give it a try.  I have since researched the plant, and I've learn a few more things about this super-plant: first of all, although the flowers may have been eaten in the past in small amounts (I suppose that's the reason they put it with other 'herbs'), the leaves are actually toxic if you eat too much.  So I don't think I'll be eating these - I have enough non-controversial vegetables growing.

The flowers, apart from pretty - and popular with the nectar-eating insect population, when dry can be used to make a spray that repels aphids, and it can also be used as companion planting for the same reason (I put mine next to the tomatoes, just in case). And finally, the leaves are apparently a very good fertiliser and rich in potasium (I think it was).

This plant is perennial and they recommend chopping it to the ground at the end of the summer, so I've just done that (apart from this branch that had the flowers) and put the chopped leaves at the base of my autumn-fruiting raspberries, which will hopefully appreciate the extra potassium and decide to produce some flowers.

Esta planta se llama tanacetum vulgaris. La compre porque estaba con las hierbas aromaticas en la tienda y todas las demas ya las tenia en casa. La vendian como comestible, pero despues de investigar en casa he descubierto varias cosas: para empezar, las hojas son comestibles solo en pequenas cantidades, porque son toxicas. Asi que ya esta fuera de mi lista de comestibles, pues tengo muchas mas plantas que no son toxicas y me sobran para comer. 


Las flores supuestamente repelen el pulgon: o bien por plantarlas al lado de las cosechas que quieres proteger, o tambien puedes secar las flores y hacer un espray casero. Y a las abejas y las polillas/mariposas (como la de la foto) les encanta. Por ultimo, las hojas dicen que tienen un monton de minerales y puedes hacer un "caldo" fertilizante o simplemente ponerlas al pie de las plantas. 


Es perenne y dicen que la puedes podar hasta el suelo al final del verano, que es justo lo que he hecho yo (excepto la rama de la foto con las flores, que las deje porque son muy bonitas), las hojas que pode las he puesto al pie de las frambuesas - a ver si me dan otra cosecha en otono.

Sunday, 4 September 2011

Tomato blight, and late-summer tidy up

Saturday was so warm and sunny, it didn't feel at all like we're already in late summer and we need to start preparing for the autumn. Late summer can bring nice days like yesterday, but it's also tomato blight season... And my plants sadly caught it really badly. It came so quick! In literally days the plants went from healthy to covered in brown splotches and wilting leaves. I had to take out all of the plants, which was very sad because I've barely had time to eat any ripe home-grown tomatoes this year. Next year, definitely one crop for the allotment! In the space left by the tomatoes I've sown spinach, radish and parsley, which in theory should give a crop during the autumn.

Tomato plants affected by blight
This cage protecting my kale and tree cabbage from the pigeons and caterpillars (in theory) was too low, so I've made a new taller one. I kept the long branch of nasturtiums though, I can see it from the kitchen and it is so cheerful!

Scrambling flowering nasturtium
In the bed next to the kale and cabbage there's a similar cage with sprouting broccoli, a courgette and a chard plant.  I cleared a space next to them, but I'm waiting until these seedlings are bit bigger before planting them out. I don't want to wait too late and plant them when it's too cold, but bigger plants will (hopefully) resist the slug attack better.

Seedlings in trays awaiting autumn planting

Thursday, 1 September 2011

Courgette turned into jam

Homemade marrow and ginger jam jars


This is what I've done with my courgette crop of one (so far). The marrow (or overgrown courgette) was smaller than last year, but I wanted to pick it to encourage the plant to produce more fruit - I've noticed a couple more flowers.

El calabacin era mas pequeno que el del ano pasado, pero lo corte para animar a la planta a que produzca mas fruta - la planta tiene un par de flores.